


Soil Testing to Guide Fertilizer Management
Importance of Soil Testing
Crop yield potential and soil nutrient status vary from year to year and from field to field (Walsh 2015). These differences are due to several factors, including weather conditions, nutrient removal of the previous crop grown and its yield, as well as on-farm management practices. Soil testing assists in addressing temporal (year-to-year) and spatial (within-field and field-to-field) variability, and thus is an important factor to ensure optimal nutrient use efficiency.
Soil testing is a necessary component of successful, sustainable soil nutrient management (Nair 2018). Proper soil testing offers many benefits, including economic (e.g., optimizing production inputs, eliminating overapplication of fertilizers), agronomic (e.g., enhancing crop yield and quality, tailoring fertilizer inputs to individual crop needs), and environmental (e.g., soil nutrient status monitoring, reducing the risk of nutrient loss to air and water). Soil testing allows growers to make better-informed nutrient management decisions and plays a key role in identifying problem areas in a field (United States Department of Agriculture National Resources Conservation Service 2007).
Many advances have been made in recent years in agricultural technologies (e.g., variable rate fertilization), but the technologies do not delineate useful basic agronomic principles like monitoring soil fertility. This publication fills in that gap by focusing on proper soil sampling methodologies as well as it provides resource information needed to conduct soil sample analyses.
Soil Sampling Procedures
Reliable fertilizer recommendations are developed through research by calibrating laboratory soil test values and correlating them with crop responses to fertilizer rates. It is important to recognize that soil test results are only as good as the soil sample; indeed, poor soil sampling procedures account for more than 90% of all errors in fertilizer recommendations based on soil tests.
Sampling Time
A soil test is a chemical evaluation of a soil’s capability to supply nutrients to plants (Hochmuth et al. 2017). Essentially, a soil test is a snapshot of the nutrient status of the soil at the time of sampling. Because nutrient concentrations in the soil vary during the season, it is important to collect soil samples as close as possible to anticipated fertilizer applications; for example, at-planting fertilization (to ensure good stand establishment) and in-season fertilizer application (for optimized yield and quality).
Sampling Frequency
For optimal soil fertility management, samples should be collected each year, and fields fertilized for a realistic potential yield of the intended crop. Although annual soil sampling is most effective, it may be cost prohibitive for some growers. It is recommended to collect soil samples at least once during each crop rotation cycle (Walworth 2011). Maintain a record of soil test results on each field to evaluate long-term trends in nutrient levels.

Sampling Technique
Collecting a soil sample that represents the area to be fertilized is key (USDA NRCS 2007). If the soil sample is not representative, the test results and recommendations can be misleading. For best results, follow these five steps:
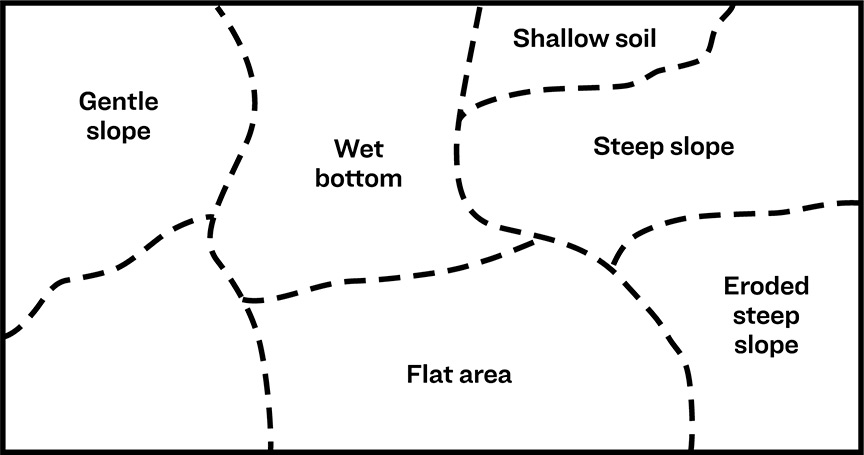
1. Divide field into units
Since most fields are not completely uniform and may vary in topography, divide each field into sampling units (Figure 1).
2. Plan out sampling path
Soil cores must be taken randomly within each sampling unit; be sure to distribute sampling sites throughout the unit. Meander or zigzag throughout each sampling unit while collecting soil samples. Note: Special considerations are necessary in eroded areas, furrow irrigation, and those under no-till (see “Special Sampling”). If you plan to sample less than a year after banding or injecting fertilizer, see Table 2, “Areas where fertilizer has been banded.”
3. Determine the number of samples
The number of samples needed to obtain a representative composite sample depends on the uniformity and size of the sampling unit (Table 1).
| Field size, acres | Recommended number of samples |
|---|---|
| <5 | 15 |
| 5-10 | 18 |
| 10-25 | 20 |
| 25-50 | 25 |
| >50 | 30 |
*An absolute minimum of 10 samples from each sampling unit is necessary to obtain an acceptable sample.

4. Define sampling depth
Laboratory tests are calibrated to specific depths. Collect samples from the following appropriate depths, because a core taken deeper or shallower will generate inaccurate results. Although most fertilizer guides are based on a 2 ft depth, the sampling depth should be tailored to crop-specific rooting depth for the most accurate recommendations. For beans and sugar beets, the soil samples are typically collected from 2 ft. For potatoes, 1 ft samples are appropriate, due to a shallower rooting depth. With wheat rooting depth reaching up to 5 ft, it would be beneficial to sample wheat fields to 5 ft, in 1 ft increments. This allows more accurate quantification of the plant-available soil nutrient pool.
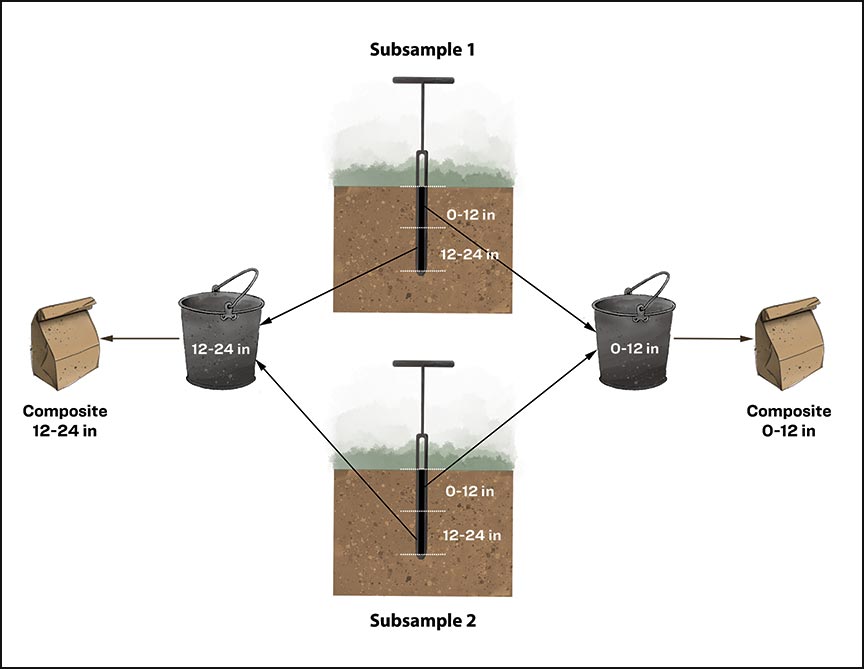
5. Collect samples
Within each sampling unit, take soil subsamples from several different locations using an auger; mix the subsamples into one composite sample, keeping the subsamples separated by depth (Figure 2). The total amount of soil you collect from each sampling unit may be more than you need for analysis. Prepare a composite sample by mixing the individual subsamples together thoroughly, then take a smaller soil sample (at least 1 p or about 1 lb) from the composite mixture.
Sample Handling
Soil samples need special handling to ensure accurate results and minimize changes in nutrient levels. Soil sample bags are often available from the laboratories at little or no cost. Place well-mixed soil samples into soil sampling bags and ship them to the laboratory for analysis as soon as possible. If samples cannot be shipped to the lab immediately:
- freeze or refrigerate them for up to 1 week, or
- air dry them at room temperature by spreading the sample in a thin layer on a plastic sheet.
Make sure to label each sample bag by providing your name, your contact information, sample depth, and sample location such as field number. The field number should correspond to a field or farm map that shows the areas sampled. If you would like the lab to make fertilizer recommendations based on the soil test results, specify the crop to be grown, a realistic yield potential, and recent field history (previous crop, fertilizer applied, incorporated residue).
Dos and Don’ts
- Do use clean sampling equipment. Make sure it is free of fertilizer—even a trace of fertilizer dust can result in a highly erroneous soil test value.
- Do avoid or discard surface litter such as straw or manure when taking soil samples.
- Do keep soil samples moist and cool at all times to avoid nutrient loss due to increased biological activity.
- Do use University of Idaho Extension nutrient management guidelines for making fertilizer recommendations based on your soil test results. Fertilizer guides can be found at https://www.extension.uidaho.edu/crops.aspx.
- Don’t sample snow-covered fields. The snow makes it difficult to recognize and avoid unusual areas in the field, so you may not get a representative sample.
- Don’t use postharvest fall soil test values to make spring fertilizer application recommendations. The soil nutrient levels may change dramatically from the time the soil was sampled.
- Don’t use galvanized or brass equipment of any kind. It will contaminate the samples with micronutrients.
- Don’t sample unusual field areas (e.g., eroded sections, dead furrows, and fence lines).
- Don’t dry samples where agricultural chemical or fertilizer fumes or dust could come in contact with them.
- Don’t use artificial heat when drying soil samples.
Special Sampling
Special sampling (described in Table 2) is advised for fields that
- have been leveled or have eroded areas
- are surface/furrow-irrigated
- have had a fertilizer band applied in the previous year
| Circumstance | Recommendation |
|---|---|
| Land-leveled and eroded areas | Sample these areas separately if they are large enough to be managed/fertilized differently from other areas. Do not include in sampling if they are not large enough and will be managed the same as the rest of the field. |
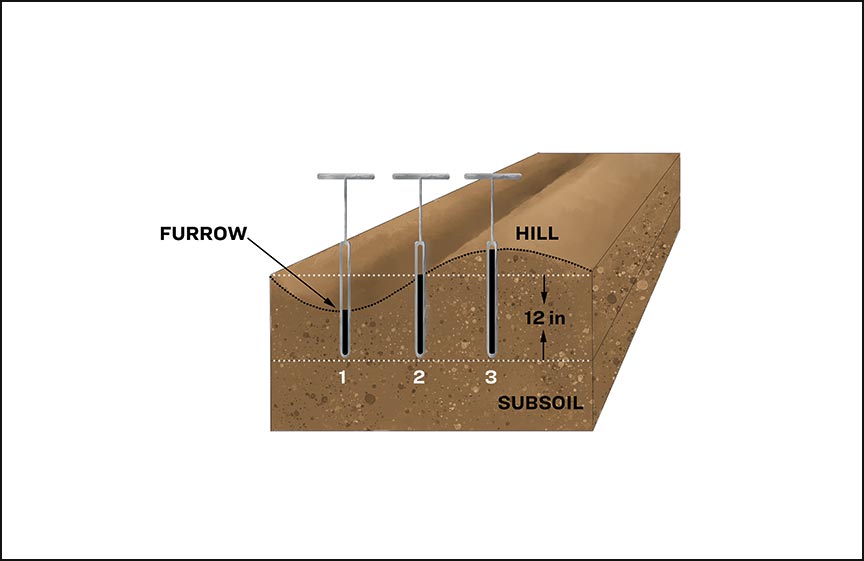
| Surface (furrow) irrigated fields (see Figure 3) | Sample furrow-irrigated fields before the furrowing operation. If sampling after furrowing is completed:
|
| Areas where fertilizer has been banded (see Figure 4). | Where fertilizer has been banded and tillage has occurred before soil sampling, follow regular sampling procedures.
If tillage has not adequately mixed the soil, special soil sampling is required. If direction, depth, and spacing of fertilizer bands is known, choose a systematic or controlled sampling method. If direction, depth, and spacing of fertilizer bands is NOT known, use a random method. Systematic method:
|


Precision Soil Testing
In order to treat in-field variability, it is important first to understand the nature and extent of variability present in the field. This can be done by utilizing soil surveys. The Web Soil Survey provides geographically referenced digital soil surveys freely available for download from the USDA NRCS website for most Idaho counties.
Several sensor-based systems are currently available for growers interested in conducting sensor-based soil testing and developing precise field management plans.
As an example, Soil Information System (SIS) (Trimble, Sunnyvale, California) allows the user to
- assess soil properties (i.e., soil texture, compaction, root zone depth, moisture retention and availability, and soil fertility)
- view soil test results for the top 48 in of the field’s surface in 3D format
- download soil maps into a farm management software application
- create variable rate application maps
A 2014 Return on Investment study in viticulture has shown that SIS delivered $97/acre and $111/acre savings in lime and potassium applications, respectively, with comparable or better yield and quality (Trimble 2011–14).
Another way to improve the efficiency and precision of soil sampling is to invest in automated soil sampling equipment, or to use automated sampling services. Examples of such equipment include
- Falcon 5000 (Falcon Soil Technology, Monroe, North Carolina): Soil-sampling machine that collects, logs, and stores soil samples on the go; mixes composite samples by mixing the collected cores, filling the sampling containers, indexing the samples, and storing them on the back of a trailer.
- AutoProbe (AgRobotics, Brighton, Illinois): The tractor-mounted machine enables you to pull up to 40 cores in consistent, uniform, and accurate distances, angles, and depths.
A 2015 study indicated that AutoProbe sampling at 2.5 acre grids (compared to hand sampling at 2.5 acre grids) predicted less potash needed to be applied, which resulted in a savings of $12.00/acre (McAlister 2016).
Many precision soil-testing methodologies and equipment fall under NRCS Environmental Quality Incentives Programs (EQIP) like Water Quality Enhancement Activity (i.e., Precision Application Technology to Apply Nutrients). For more information about EQIP, please contact your local NRCS field office.
Choosing a Laboratory
It is important to choose a laboratory certified through the Performance Assessment Program (PAP). The PAP is a voluntary program offered by the Soil Science Society of America. It is operated as a part of the North American Proficiency Testing program (NAPT). The PAP has been adopted by the NRCS as assurance that soil test analyses are being performed using validated testing methods.
Currently, PAP-certified laboratories are listed on the NAPT website: https://www.naptprogram.org/about/participants/all/.
Note: This bulletin is an updated and expanded version of BUL 704 by Robert L. Mahler and Terry A. Tindall, last revised in 1997.
References
Hochmuth, G., R. Mylavarapu, and E. Hanlon. 2017. Soil Testing for Plant-Available Nutrients—What Is It and Why Do We Use It? University of Florida Extension, SL408. 5 p. https://edis.ifas.ufl.edu/pdffiles/SS/SS62100.pdf.
Mahler, Robert. L., and Terry A. Tindall. 1997. Soil Sampling. Reprint ed. University of Idaho Extension, Bulletin 704. 8 p.
McAlister, R. 2016. “PFR Report: Improving Fertility Management and Profitability through PFR Soil Sampling Studies.” Beck’s Blog. 3 February. https://www.beckshybrids.com/Blog/ArtMID/841/userid/101/ArticleID/363/PFR-Report-Improving-Fertility-Managment-and-Profitability-Through-PFR-Soil-Sampling-Studies.
Nair, A. 2018. “Importance of Soil Fertility in Vegetable Crop Production.” Iowa State University Extension and Outreach. https://www.extension.iastate.edu/smallfarms/importance-soil-fertility-vegetable-crop-production.
Trimble. 2011–14. Return on Investment: Viticulture. Sunnyvale, CA: Trimble Navigation. 9 p. http://trl.trimble.com/docushare/dsweb/Get/Document-719299/Return On Investment - Viticulture - English US.pdf.
USDA NRCS. 2007. Sampling Soils for Nutrient Management. Bozeman, MT: USDA NRCS. 2 p. https://www.nrcs.usda.gov/Internet/FSE_DOCUMENTS/nrcs144p2_051273.pdf.
Walsh, O.S. 2015. Nitrogen Management in Field Crops with Reference Strips and Crop Sensors. University of Idaho Extension, Bulletin 896. 6 p. View PDF >>
Walworth, J.L. 2011. Soil Sampling and Analysis. University of Arizona Cooperative Extension, AZ 1412. 5 p. https://extension.arizona.edu/sites/extension.arizona.edu/files/pubs/az1412.pdf.
About the Authors
Olga S. Walsh—Research Associate Professor, Cropping Systems Agronomy, Parma Research and Extension Center
Robert L. Mahler—Professor, Soil, Water, and Environmental Sciences, University of Idaho Boise
Terry A. Tindall—Senior Agronomist, JR Simplot, Boise, ID
Disclaimer
The names of specific systems and equipment provided in this bulletin are examples, and not intended as advertising or an other form of recommendation.
BUL 915 | Published June 2020 | © 2022 by the University of Idaho